들어가기에 앞서
안녕하세요! 오랜만에 인사드립니다:) 지난 여름방학에 시작한 조코딩님 웹개발 강의 리뷰를 바쁜 일로 미루고 미루다 결국 겨울방학에 마무리하게 되었습니다. 올해는 조코딩님 웹개발 강의 리뷰 포스팅을 하면서 더 많은 방문자를 얻을 수 있었고, 구글 애드센스도 블로그에 걸 수 있게 되어 매우 뿌듯한 해였습니다. 찾아와 주셔서 감사드리고, 내년에도 다양한 주제로 포스팅 하겠습니다😎
CRUD
 이미지 출처: Medium
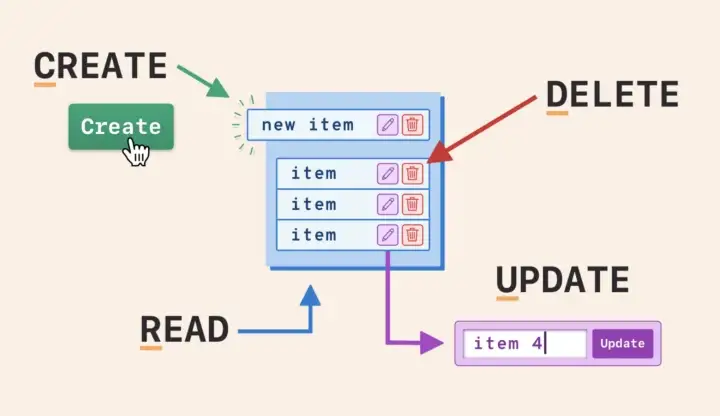
Create, Read, Update, Delete
CRUD는 대부분의 컴퓨터 소프트웨어가 가지는 기본적인 데이터 처리 기능인 Create(생성), Read(읽기), Update(갱신), Delete(삭제)를 묶어서 일컫는 말입니다 (위키백과). 대부분의 웹사이트에서 CRUD를 활용한 서비스들을 제공하기 때문에 이번 포스트에서는 조코딩님이 만들었던 댓글창을 다시 만들어보며 CRUD를 직접 실습해 보도록 하겠습니다.
DB(SQLite)를 이용한 댓글창 만들기
이번 포스팅에서는 지난 4주차 리뷰에서 다뤘던 express 모듈 말고도 ejs, sequelize 등의 모듈들을 사용할 예정입니다. 우선 저번처럼 실습에 사용할 폴더와 파일을 다음과 같이 만들어 줍니다.
1
2
└── comments
    └── index.js
comments 폴더를 드래그 & 드랍하여 VS Code를 실행시키면 comments 폴더를 VS Code에서 열 수 있습니다. VS Code를 실행하셨다면 4주차 리뷰와 마찬가지로 npm을 통해 모듈을 다운받고, 관리하기 위해 터미널을 열어 다음과 같이 명령어를 입력합니다.
1
>npm init
위 명령어를 입력하시면 모듈을 관리하기 위한 package.json 파일을 만들게 되며 이 때 필요한 정보를 입력해야 하는데 모두 Enter를 눌러 기본 설정으로 하셔도 무방합니다. package.json 파일을 만드는 데 성공하셨다면 다음은 모듈 설치입니다.
1
>npm install express ejs sequelize sqlite3
모든 모듈들의 설치가 완료된 comments 폴더의 구성은 다음과 같습니다.
1
2
3
4
5
└── comments
    ├── node_modules
    ├── index.js
    ├── package-lock.json
    └── package.json
ejs
ejs 모듈은 Embedded JavaScript templating의 약자로 HTML 기반으로 script 태그 없이 JavaScript를 실행시킬 수 있도록 하는 templating 언어입니다.
sequelize
sequelize 모듈은 Node.js 환경에서 DB 작업을 쉽게 할 수 있도록 도와주는 모듈입니다.
다음은 댓글창 구현을 위해 추가로 comments 폴더 안에 views 폴더를 만들고 그 안에 index.ejs 파일을 만들어 줍니다.
1
2
3
4
5
6
7
└── comments
    ├── node_modules
    ├── views
    │   └── index.ejs
    ├── index.js
    ├── package-lock.json
    └── package.json
이제 모든 준비가 끝났습니다. 실습을 진행하며 다음의 명령어를 통해 결과물을 로컬 서버에서 확인할 수 있으니 자주 확인해 보시기 바랍니다:)
1
>node index.js
로컬 서버를 종료하는 단축키는 Ctrl+C 입니다:)
Create (댓글 생성)
1
2
3
4
5
6
7
8
9
10
11
12
13
14
15
16
17
18
19
20
21
22
23
24
25
26
27
28
29
30
31
32
33
34
35
36
37
38
39
40
41
42
43
var express = require('express');
var app = express();

const { Sequelize, DataTypes } = require('sequelize');
const sequelize = new Sequelize({
  dialect: 'sqlite',
  storage: 'database.sqlite'
});

const Comments = sequelize.define('Comments', {
  // Model attributes are defined here
  content: {
    type: DataTypes.STRING,
    allowNull: false
  }
}, {
  // Other model options go here
});

(async () => {
  await Comments.sync();
})();

app.use(express.json());
app.use(express.urlencoded({ extended: true }));

// set the view engine to ejs
app.set('view engine', 'ejs');

// index page
app.get('/', async function(req, res) {
  res.render('index');
});

app.post('/create', async function(req, res) {
  const { content } = req.body;
  const comment = await Comments.create({ content: content });

  res.redirect('/')
});

app.listen(3000);
console.log('Server is listening on port 3000');
1
2
3
4
5
6
7
8
9
10
11
12
13
14
15
<!DOCTYPE html>
<html lang="ko">
<head>
    <meta charset="UTF-8">
    <meta http-equiv="X-UA-Compatible" content="IE=edge">
    <meta name="viewport" content="width=device-width, initial-scale=1.0">
    <title>댓글창 만들기</title>
</head>
<body>
    <form action="/create" method="post">
        <input type="text" name="content">
        <input type="submit" value="댓글 작성">
    </form>
</body>
</html>
Create는 views/index.ejs의 form 태그에서 post 방식으로 댓글을 제출하면 백엔드에서 작성된 댓글 내용을 기반으로 DB에 새로운 댓글을 생성하는 방식으로 작동합니다. 위와 같이 코드를 입력하고 index.js를 실행하게 되면 로컬에 다음과 같이 나타나게 됩니다.

본 실습에서는 위와 같이 안녕하세요라는 댓글을 작성해 보겠습니다. 댓글 작성 버튼을 누르게 되면 댓글 작성이 완료되는데 로컬 서버를 열며 생긴 database.sqlite 파일을 통해 다음과 같이 작성한 댓글이 DB에 제대로 생성됐는지 확인할 수 있습니다.

Read (댓글 읽기)
다음의 코드는 Read 기능이 추가된 코드입니다.
1
2
3
4
5
6
7
8
9
10
11
12
13
14
15
16
17
18
19
20
21
22
23
24
25
26
27
28
29
30
31
32
33
34
35
36
37
38
39
40
41
42
43
44
var express = require('express');
var app = express();

const { Sequelize, DataTypes } = require('sequelize');
const sequelize = new Sequelize({
  dialect: 'sqlite',
  storage: 'database.sqlite'
});

const Comments = sequelize.define('Comments', {
  // Model attributes are defined here
  content: {
    type: DataTypes.STRING,
    allowNull: false
  }
}, {
  // Other model options go here
});

(async () => {
  await Comments.sync();
})();

app.use(express.json());
app.use(express.urlencoded({ extended: true }));

// set the view engine to ejs
app.set('view engine', 'ejs');

// index page
app.get('/', async function(req, res) {
  const comments = await Comments.findAll();
  res.render('index', { comments: comments });
});

app.post('/create', async function(req, res) {
  const { content } = req.body;
  const comment = await Comments.create({ content: content });

  res.redirect('/')
});

app.listen(3000);
console.log('Server is listening on port 3000');
1
2
3
-(32) res.render('index');
+(32) const comments = await Comments.findAll();
+(33) res.render('index', { comments: comments });
1
2
3
4
5
6
7
8
9
10
11
12
13
14
15
16
17
18
19
20
21
22
<!DOCTYPE html>
<html lang="ko">
<head>
    <meta charset="UTF-8">
    <meta http-equiv="X-UA-Compatible" content="IE=edge">
    <meta name="viewport" content="width=device-width, initial-scale=1.0">
    <title>댓글창 만들기</title>
</head>
<body>
    <h1>댓글 목록</h1>
    <ul>
    <% for (comment of comments) { %>
        <li><%= comment.content %></li>
    <% } %>
    </ul>
    <hr>
    <form action="/create" method="post">
        <input type="text" name="content">
        <input type="submit" value="댓글 작성">
    </form>
</body>
</html>
1
2
3
4
5
6
7
+(10) <h1>댓글 목록</h1>
+(11) <ul>
+(12) <% for (comment of comments) { %>
+(13)     <li><%= comment.content %></li>
+(14) <% } %>
+(15) </ul>
+(16) <hr>
Read는 메인 화면으로 DB의 모든 댓글들을 전송해 화면에 띄워서 읽을 수 있게 만들어 줍니다. 이 때 기존의 실습에서 해왔듯이 (3주차 리뷰(1) 참조) DOM을 활용하여 script 태그의 JavaScript 코드로 댓글을 추가하지 않고, <% %>과 <%= %> 안에 JavaScript 코드를 그대로 쓴 것을 확인하실 수 있으실 겁니다. 이는 앞서 소개한 ejs 모듈의 기능으로 <% %>를 통해 script 태그 없이 JavaScript 코드를 작동하고, <%= %>를 통해 JavaScript 안의 변수값을 출력할 수 있습니다.
다음은 index.js의 실행 결과입니다.

Update (댓글 수정)
다음의 코드는 Update 기능이 추가된 코드입니다.
1
2
3
4
5
6
7
8
9
10
11
12
13
14
15
16
17
18
19
20
21
22
23
24
25
26
27
28
29
30
31
32
33
34
35
36
37
38
39
40
41
42
43
44
45
46
47
48
49
50
51
52
53
54
55
56
var express = require('express');
var app = express();

const { Sequelize, DataTypes } = require('sequelize');
const sequelize = new Sequelize({
  dialect: 'sqlite',
  storage: 'database.sqlite'
});

const Comments = sequelize.define('Comments', {
  // Model attributes are defined here
  content: {
    type: DataTypes.STRING,
    allowNull: false
  }
}, {
  // Other model options go here
});

(async () => {
  await Comments.sync();
})();

app.use(express.json());
app.use(express.urlencoded({ extended: true }));

// set the view engine to ejs
app.set('view engine', 'ejs');

// index page
app.get('/', async function(req, res) {
  const comments = await Comments.findAll();
  res.render('index', { comments: comments });
});

app.post('/create', async function(req, res) {
  const { content } = req.body;
  const comment = await Comments.create({ content: content });

  res.redirect('/')
});

app.post('/update/:id', async function(req, res) {
  const { content } = req.body;
  const { id } = req.params;
  await Comments.update({ content: content }, {
    where: {
      id: id
    }
  });

  res.redirect('/')
});

app.listen(3000);
console.log('Server is listening on port 3000');
1
2
3
4
5
6
7
8
9
10
11
+(43) app.post('/update/:id', async function(req, res) {
+(44) const { content } = req.body;
+(45) const { id } = req.params;
+(46) await Comments.update({ content: content }, {
+(47)   where: {
+(48)     id: id
+(49)   }
+(50) });
+(51)
+(52) res.redirect('/')
+(53) });
1
2
3
4
5
6
7
8
9
10
11
12
13
14
15
16
17
18
19
20
21
22
23
24
25
26
<!DOCTYPE html>
<html lang="ko">
<head>
    <meta charset="UTF-8">
    <meta http-equiv="X-UA-Compatible" content="IE=edge">
    <meta name="viewport" content="width=device-width, initial-scale=1.0">
    <title>댓글창 만들기</title>
</head>
<body>
    <h1>댓글 목록</h1>
    <ul>
    <% for (comment of comments) { %>
        <li><%= comment.content %></li>
        <form action="/update/<%= comment.id %>" method="post">
            <input type="text" name="content">
            <input type="submit" value="댓글 수정">
        </form>
    <% } %>
    </ul>
    <hr>
    <form action="/create" method="post">
        <input type="text" name="content">
        <input type="submit" value="댓글 작성">
    </form>
</body>
</html>
1
2
3
4
+(14) <form action="/update/<%= comment.id %>" method="post">
+(15)     <input type="text" name="content">
+(16)     <input type="submit" value="댓글 수정">
+(17) </form>
Update는 Create와 마찬가지로 views/index.ejs의 form 태그에서 post 방식으로 댓글을 업데이트하면 해당 댓글의 id를 통해 DB 안에 같은 id를 가진 댓글을 수정하는 방식으로 작동합니다.
다음은 index.js의 실행 결과입니다.
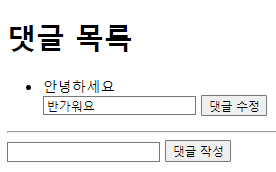
위의 댓글 수정 버튼을 누르게 되면 안녕하세요라는 댓글이 반가워요로 바뀌게 됩니다.
Delete (댓글 삭제)
다음의 코드는 Delete 기능이 추가되어 CRUD가 모두 적용된 코드입니다.
1
2
3
4
5
6
7
8
9
10
11
12
13
14
15
16
17
18
19
20
21
22
23
24
25
26
27
28
29
30
31
32
33
34
35
36
37
38
39
40
41
42
43
44
45
46
47
48
49
50
51
52
53
54
55
56
57
58
59
60
61
62
63
64
65
66
67
var express = require('express');
var app = express();

const { Sequelize, DataTypes } = require('sequelize');
const sequelize = new Sequelize({
  dialect: 'sqlite',
  storage: 'database.sqlite'
});

const Comments = sequelize.define('Comments', {
  // Model attributes are defined here
  content: {
    type: DataTypes.STRING,
    allowNull: false
  }
}, {
  // Other model options go here
});

(async () => {
  await Comments.sync();
})();

app.use(express.json());
app.use(express.urlencoded({ extended: true }));

// set the view engine to ejs
app.set('view engine', 'ejs');

// index page
app.get('/', async function(req, res) {
  const comments = await Comments.findAll();
  res.render('index', { comments: comments });
});

app.post('/create', async function(req, res) {
  const { content } = req.body;
  const comment = await Comments.create({ content: content });

  res.redirect('/')
});

app.post('/update/:id', async function(req, res) {
  const { content } = req.body;
  const { id } = req.params;
  await Comments.update({ content: content }, {
    where: {
      id: id
    }
  });

  res.redirect('/')
});

app.post('/delete/:id', async function(req, res) {
  const { id } = req.params;
  await Comments.destroy({
    where: {
      id: id
    }
  });

  res.redirect('/')
});

app.listen(3000);
console.log('Server is listening on port 3000');
1
2
3
4
5
6
7
8
9
10
+(55) app.post('/delete/:id', async function(req, res) {
+(56)   const { id } = req.params;
+(57)   await Comments.destroy({
+(58)     where: {
+(59)       id: id
+(60)     }
+(61)   });
+(62)
+(63)   res.redirect('/')
+(64) });
1
2
3
4
5
6
7
8
9
10
11
12
13
14
15
16
17
18
19
20
21
22
23
24
25
26
27
28
29
<!DOCTYPE html>
<html lang="ko">
<head>
    <meta charset="UTF-8">
    <meta http-equiv="X-UA-Compatible" content="IE=edge">
    <meta name="viewport" content="width=device-width, initial-scale=1.0">
    <title>댓글창 만들기</title>
</head>
<body>
    <h1>댓글 목록</h1>
    <ul>
    <% for (comment of comments) { %>
        <li><%= comment.content %></li>
        <form action="/update/<%= comment.id %>" method="post">
            <input type="text" name="content">
            <input type="submit" value="댓글 수정">
        </form>
        <form action="/delete/<%= comment.id %>" method="post">
            <input type="submit" value="댓글 삭제">
        </form>
    <% } %>
    </ul>
    <hr>
    <form action="/create" method="post">
        <input type="text" name="content">
        <input type="submit" value="댓글 작성">
    </form>
</body>
</html>
1
2
3
+(18) <form action="/delete/<%= comment.id %>" method="post">
+(19)     <input type="submit" value="댓글 삭제">
+(20) </form>
Delete는 해당 댓글의 id를 통해 DB 안에 같은 id를 가진 댓글을 삭제하는 방식으로 작동합니다.
다음은 index.js의 실행 결과입니다.
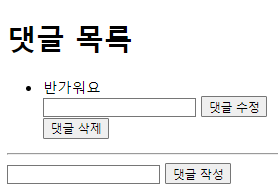
위 화면에서 댓글 삭제 버튼을 누르게 되면 반가워요 댓글은 DB에서 삭제됩니다.
긴 글 읽어주셔서 항상 감사합니다:)